Master Tile Installation: The Best Leveling Wedges and Clips
Importance of Leveling in Tile Installation
Leveling is a crucial aspect of tile installation that cannot be overlooked. Proper leveling ensures that each tile is laid evenly, resulting in a smooth and aesthetically pleasing surface. Uneven tiles not only look unattractive but can also pose safety hazards such as tripping. Moreover, improperly leveled tiles are more susceptible to cracking, reducing the longevity of your flooring or wall.
Ensuring that your tiles are level helps maintain the structural integrity of the installation. When tiles are not level, the adhesive that holds them in place can become compromised over time. This can lead to tiles lifting, shifting, or even breaking. Proper leveling distributes the weight and stress evenly across all tiles, making the entire installation more durable.
In addition to functional benefits, leveling also plays a significant role in the overall visual appeal of your tile installation. Even minor discrepancies in tile height can be noticeable and can detract from the beauty of your work. By investing in quality leveling wedges and clips, you can achieve a professional finish that enhances the look and value of your space.
Overview of Leveling Wedges and Clips
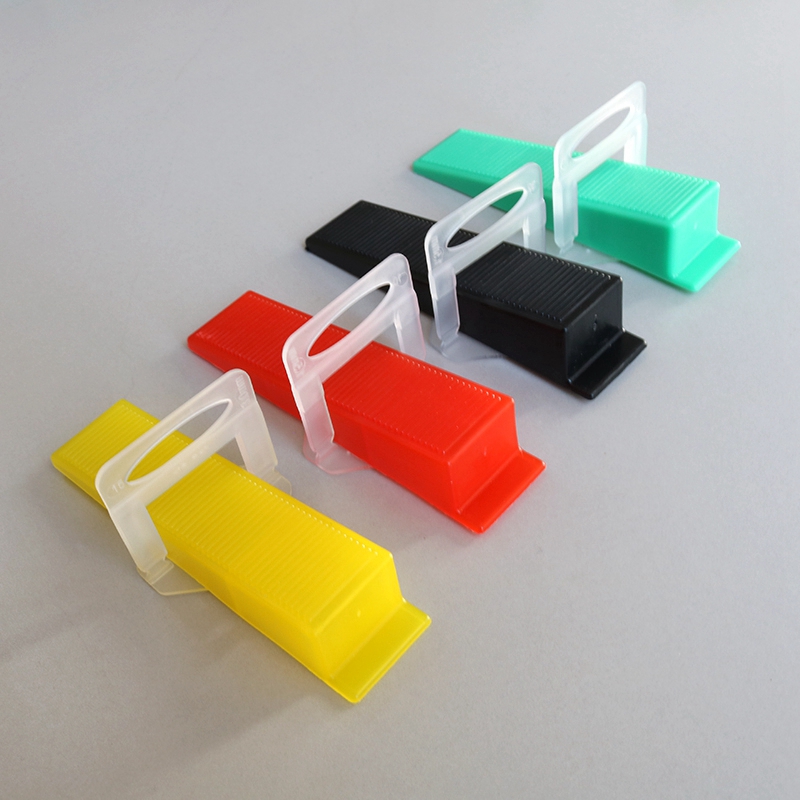
Leveling wedges and clips are essential tools used to ensure that tiles are installed evenly. They work together to hold tiles in place while the adhesive sets, minimizing the risk of lippage, which occurs when adjacent tiles are not at the same height. These tools are particularly useful for large format tiles, which are more prone to uneven installation due to their size and weight.
Wedges are typically made of durable plastic and have a tapered design that allows for fine adjustments. They are inserted between tiles and then tightened to lift or lower the tiles as needed. Clips, on the other hand, are placed under the tiles and have a slot where the wedge can be inserted. Once the wedge is in place, the clip holds the tile securely until the adhesive dries.
There are various brands and types of leveling wedges and clips available on the market, each offering different features and benefits. Some systems are designed for ease of use, making them ideal for DIY enthusiasts, while others are more suited for professional use due to their advanced features and higher cost. Regardless of the type you choose, using leveling wedges and clips can significantly improve the quality of your tile installation.
Types of Leveling Wedges and Clips
There are several types of leveling wedges and clips available, each designed to cater to different needs and preferences. The most common types include reusable and single-use systems. Reusable systems are made from high-quality materials that can withstand multiple uses, making them a cost-effective option for frequent tilers. Single-use systems, on the other hand, are typically more affordable upfront but need to be purchased for each new project.
Another distinction can be made between manual and automatic leveling systems. Manual systems require the user to insert the wedges and adjust the clips by hand. These systems are generally more affordable and provide a high level of control, making them a popular choice for DIY enthusiasts. Automatic leveling systems, however, use specialized tools to insert and adjust the wedges and clips. These systems are more expensive but can save time and effort, making them ideal for large projects or professional use.
Additionally, some leveling systems are specifically designed for certain types of tiles or installation methods. For example, there are systems tailored for thin tiles, large format tiles, or natural stone. Understanding the specific requirements of your project can help you choose the most suitable leveling system, ensuring the best possible outcome.
How to Choose the Right Leveling Wedges and Clips
Selecting the right leveling wedges and clips for your project involves considering several factors. The first is the type of tiles you are using. Large format tiles typically require a more robust leveling system to handle their size and weight. Conversely, smaller tiles may not require as much support and can be effectively installed with simpler systems.
Another important consideration is the thickness of your tiles. Some leveling systems are designed to handle a wide range of tile thicknesses, while others are more specialized. Make sure to check the specifications of the leveling system to ensure it is compatible with your tiles. Additionally, consider the type of adhesive you will be using, as some adhesives may require specific types of leveling systems to achieve optimal results.
Your experience level and the scope of your project are also crucial factors. If you are a DIY enthusiast working on a small project, a manual, single-use system may be sufficient. However, if you are a professional or working on a large-scale project, investing in a reusable, automatic system can save you time and effort in the long run. Ultimately, choosing the right leveling wedges and clips involves balancing your needs, budget, and the specific requirements of your project.
Step-by-Step Guide to Using Leveling Wedges and Clips
Using leveling wedges and clips is a straightforward process, but it requires attention to detail to achieve the best results. The first step is to prepare your substrate, ensuring it is clean, dry, and level. Any irregularities in the substrate can affect the final result, so take the time to address any issues before you begin laying your tiles.
Once your substrate is ready, apply a layer of adhesive using a notched trowel. Place the clips under the edges of the tiles, ensuring they are evenly spaced. The spacing of the clips will depend on the size of your tiles and the specific leveling system you are using. As a general rule, larger tiles require more clips to ensure proper leveling.
After placing the clips, lay your tiles on top and insert the wedges into the clips. Use a leveling tool to tighten the wedges, ensuring the tiles are level with each other. Continue this process for the entire installation, regularly checking the level of the tiles and making adjustments as needed. Once the adhesive has set, remove the wedges and clips according to the manufacturer's instructions. This typically involves using a rubber mallet to gently tap the clips, breaking them off at the base. Your tiles should now be perfectly level, providing a smooth and professional finish.
Common Mistakes to Avoid During Tile Installation
Tile installation is a meticulous process that requires careful planning and execution. One of the most common mistakes is not properly preparing the substrate. Any imperfections in the substrate can affect the final result, so it is essential to ensure it is clean, dry, and level before you begin. Skipping this step can lead to uneven tiles and a less durable installation.
Another common mistake is using the wrong type of adhesive or not applying it correctly. The adhesive should be evenly spread using a notched trowel, and the tiles should be pressed firmly into place. Using too little adhesive can result in tiles not bonding properly, while using too much can cause tiles to shift or become uneven. Follow the manufacturer's instructions for the best results.
Improper use of leveling wedges and clips is also a frequent issue. It is important to use the correct number of clips and wedges for your tile size and to place them evenly. Failing to do so can result in uneven tiles and a less professional finish. Additionally, not tightening the wedges enough or over-tightening them can also cause problems. Take your time and ensure each tile is properly leveled before moving on to the next.
Maintenance Tips for Tile Floors
Once your tiles are installed and properly leveled, maintaining them is key to ensuring their longevity and appearance. Regular cleaning is essential to prevent dirt and grime from building up on the surface. Use a soft broom or vacuum to remove loose debris and a damp mop with a mild cleaning solution for deeper cleaning. Avoid using harsh chemicals or abrasive cleaners, as these can damage the tiles and grout.
Sealing the grout is another important step in maintaining your tile floors. Grout is porous and can easily absorb stains and moisture if not properly sealed. Apply a high-quality grout sealer according to the manufacturer's instructions, and reapply it every year or as needed. This will help protect the grout from stains and make it easier to clean.
Inspect your tile floors regularly for any signs of damage or wear. Address any issues promptly to prevent them from becoming more serious. For example, if you notice a loose or cracked tile, remove it and replace it with a new one. Additionally, check the grout lines for any signs of cracking or deterioration and repair them as needed. By taking these steps, you can keep your tile floors looking beautiful and in good condition for years to come.
Frequently Asked Questions about Tile Installation
Q: What is the best type of tile for flooring?
A: The best type of tile for flooring depends on your specific needs and preferences. Porcelain and ceramic tiles are popular choices due to their durability and wide range of styles. Natural stone tiles, such as marble and granite, offer a luxurious look but require more maintenance. Consider factors such as foot traffic, moisture levels, and your budget when choosing the best tile for your flooring.
Q: How long does it take for tile adhesive to dry?
A: The drying time for tile adhesive can vary depending on the type of adhesive used and the environmental conditions. Most adhesives require at least 24 hours to set, but some may take longer. Always follow the manufacturer's instructions for drying times and avoid walking on the tiles until the adhesive is fully cured.
Q: Can I install tiles over an existing tile floor?
A: Yes, it is possible to install tiles over an existing tile floor, but certain conditions must be met. The existing tiles must be in good condition, clean, and level. Any loose or damaged tiles should be repaired or replaced. Additionally, the new tiles should be installed using a thin-set adhesive specifically designed for tile-over-tile installations. This will ensure a strong bond and a durable finish.
Conclusion: Achieving Perfectly Level Tiles
Achieving perfectly level tiles is essential for a flawless and professional-looking installation. By understanding the importance of leveling, choosing the right wedges and clips, and following proper installation techniques, you can ensure a successful project. Avoid common mistakes, maintain your tile floors regularly, and address any issues promptly to keep your tiles looking their best.
Investing in high-quality leveling wedges and clips is a small cost compared to the benefits they provide. These tools can significantly improve the quality of your tile installation, making it easier to achieve a smooth, even surface. Whether you are a DIY enthusiast or a professional, using the right leveling system can make all the difference in the final result.
In conclusion, taking the time to properly level your tiles and using the right tools and techniques will pay off in the long run. Your tiles will not only look better but will also be more durable and functional. With the right approach and a little patience, you can achieve perfectly level tiles that enhance the beauty and value of your space.